Wednesday, January 12, 2011

Valentines card purse and cards

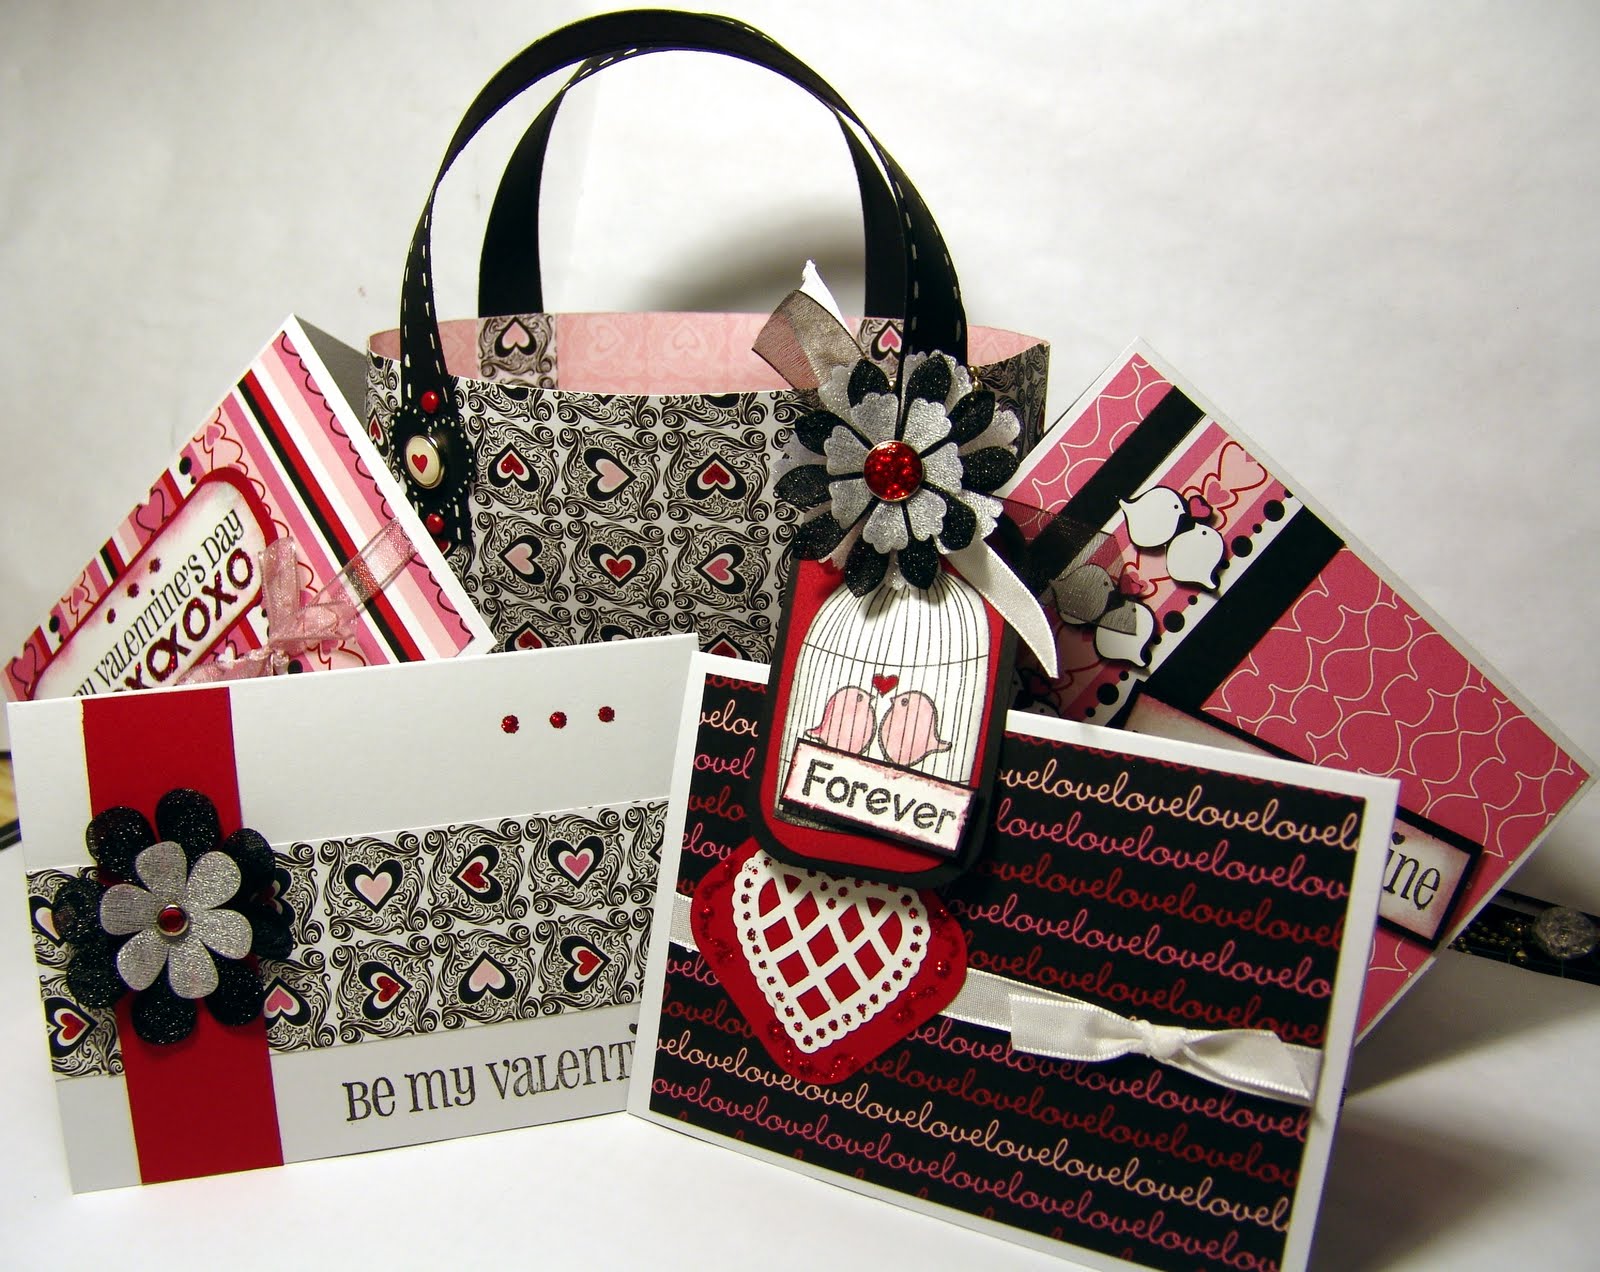
Card purse with four cards

This is a really long post because it is my first attempt for a tutorial that I used in a class I taught at WLS today. I have been making these purses for a while but several people asked me to show them how I made them.
I cased the original card purses on the Stampin Up!, Becky Roberts’ Inking Idaho, and Andrea Walford, andreawalford.com websites but seeing them I knew I needed to put my own twist on it and make it mine. Some of the purses were taller, shorter, wider, narrower and some had handles others didn’t so I changed it up and did my thing. Here is my version and even after I had taken the pictures I had changed it again. If you have any questions regarding making the card purse email me and I will see if I have an answer for you.

Supplies:
Designer paper A: 1 12x12 in sheet
Designer paper B: 1/4 12x12 sheet
Designer paper C: 1/2 12x12 sheet
Designer paper D: 3”x4”
Designer paper with birds: 4”x6”
Black card stock: 1 sheet
Red card stock: ½ sheet
White card stock: ¼ sheet
Red Stickles
Black and white flowers
Small red brads: 10
Heart Brads: 4
Glitter brad: 1 sm and 1 large
Pink Ribbon: 8 in
White Ribbon: 12in
Black Ribbon: 6 in
Ball Chain
Eyelet for tag

Equipment needed:

Paper cutter
Glue runner
Bone folder
Xyron
White gel pen
Valentine Stamps
Black ink pad
Color pens to color image.

Punches:
Lattice Heart Edge Punch
Lattice Heart Punch
Scalloped Heart Slide
Corner Rounder
Piercing tool
Scissors
Magnet

Cutting layouts:

Cutting is easier than what it seems but for those of us who need visual aides.
Designer Paper A:


Designer paper B: cut one piece 4”x5 ¼”
Designer paper C: cut two pieces 4”x5 ¼”
Cut one 1 ½” x4”
Designer paper D: cut 3 couple of birds out of the paper pattern

Red card stock:

Black Card stock:

Step 1:
Take the 4”x8” piece of red card stock and score it one inch in on all four sides. Using bone folder crease on fold lines.

Step 2:
Cut in to score line on one side on each corner. Apply red two side sticky tape (bologna tape) to the side of the flap.

Step 3:
Peel off the second piece of backing and adhere the flaps to the middle flap. Repeat all around the box till it looks like this

Step 4:
Apply a line of sticky tape around the lower edge of the box. Remove the second piece of backing around the sides and back of the box.

Step 5:
Take the 6”x10” piece of the designer paper A and adhere the paper to halfway down one side of the box making sure that the bottom piece of the paper lines up with the bottom of the box. Just eyeball the halfway mark on the sides of the box. Doesn’t have to be perfect. Then wrap the paper on around the box.

Step 6:
Now lay the box down with the box bottom facing you and remove the backing and adhere the second 6”x8” piece of DP A to the back of the box that is facing up.

Step 7:
The sides of the paper will overlap about 1” on each side.

Step 8:
Lay the box on its side and apply a piece of sticky tape down the side and a small 1” piece along the bottom side of the DP.

Step 9:
Remove the backing to the sticky tape on the bottom of the DP and adhere paper to the bottom of the box aligning it to the base. There is about a 1” overlap there but you only want about 1/4” overlap at the top. Remove backing to tape and adhere.

Step 10:
Stand box up. This is what it looks like from the inside. You will have to smooth the taped edges down.

Step 11:
This is what it looks like from the outside.

Step 12:
Punch the edging out with the Lattice Edge Punch. I went around the heart edges with a white gel pen to give it some definition.
Step 13:
Run the edging through the Xyron adhesive runner. You can use a type runner but I have found the Xyron works best and you don’t have a lot of glue residual.

Step 14:
Remove lattice edging from Xyron backing and adhere to base of box lining up with bottom of the box. You will have to cut some of the scalloping or heart off to align and work the border in.

Step 15:
Next step is the purse handle/straps. I took the ¾”x12” pieces of card stock and scored them 1/8” in on each side and then used the gel pen to make a dashed line to imitate sewing. I also went around the scalloped hearts with the gel pen.

Step 16:
I aligned the handles to the front and back of the box/purse and using the piercer I secured them to the purse with the red brads. Taking the scalloped hearts I pierced though the handles, hearts, and purse and secured them with the heart brad.

Step 17:
Taking waste paper cut some 3”x1” strips of DP-A

Step: 17a:
Adhere these strips over the brads inside the purse to cover the brad points.

Step 18:
Key chain tag

To make the key chain tag use a piece of white cardstock and stamp the birds on it. Color the birds and stamp over them with the birdcage stamp from the Bo Bunny Crush stamp set. Cut the birdcage out.

Round the corners on a 3x2” piece of black card stock and a 2 3/4x 13/4” piece of red card stock adhere the pieces together. Punch a hole in the top of the tag and using a crop-a-dile fix an eyelet in the hole. Put the Birdcage on the tag with glue dots or foam squares.
There are 3 layers of flowers on the flower using a glitter brad to hold them together. Take the ball key chain and link it through the tag and around the handle. Tie the ribbon to the key chain only then use a glue dot to adhere the flower to the ribbon.
Forever layer is from scraps and stamped from same stamp set.
Step 19:
The finished purse with key chain tag.

I should note that when I got to this point I decided I needed a closure to the top of the purse. I cut a piece of black cardstock and scored the sides and using a gel pen I made it look like stitching along the edges. I cut two tag punches in half and used the gel pen around the edges. I used a magnet adhered to the inside of the purse and sandwiched between the tag punch on the front.

Card A:
Card B:
Card C:

Card D:
Finishing inside of cards
No naked envelopes
Finished purse with cards

Hope you have fun making the purse. I did!

Whats On Your Workdesk Wednesday (WOYWW) #84

OMG! I found this site a few weeks ago and I have been following it on the Google Reader because I feel such a kindred spirit with blogger! Julia Dunnit lives in Wiltshire, UK and blogs about more than just her crafting but about a lot of aspects about her life. Every Wednesday she hosts a Whats On Your Workdesk Wednesday (WOYWW) and everyone posts pics of just that. After teaching the class at Whole Lotta Scrap today and spending the past few days 'crafting' I think I am brave enough this week to add a picture to my blog. Tomorrow is clean up day and I will start a new project but this is what it looks like tonight!


OMG! I may not be as brave as I thought...it is such a mess! OMG! There are my glasses handing on the paint rack! Oh well...Tomorrow is another day so drop by tomorrow when I will be showing some pics of what I have been up to so far this year.

Monday, December 27, 2010

Hobby Hill House March 2010

I was looking back through the posts for this year and realized I had totally missed a really important (to me)event this year. This was my third trip to Hobby Hill House in Bowie Texas. Our first visit was in May 2009 and the group was so enamored of the retreat that we all wanted to move in and stay. Cindy, the owner, knew we wanted to come back asap so she called Leslie and told her that she had an opening in August would we like it well...hell yes so we went back!


The third visit this past March was like coming home! We all had our beds and our tables and everyone was out to have a rip roaring good time. Cindy and Sandy out did themselves with hospitality and we had a blast.
Last winter and spring was snowy around here and the Saturday morning at HHH saw a snow storm roll in and we were all despairing of ever getting out of HHH...NOT!!


The cardinals are a little blurry but I wanted to post this picture anyway. HHH has tons of birds!The Swimming pool still looks welcoming even though it was only in the 20's on this day. The big barn is another cropping room and the smaller barn is Cindy and her husbands private quarters. The house is huge with 4 large bedrooms but they usually have all the rooms full of croppers in bunk beds!

On our last night there we always get together and have a dirty cropper swap and take a group picture. In this picture we all were showing off the frames we made. Fuzz brought the frames and all the stuff that we needed to decorate them.
sitting: Cindy, Fuzz(Stephanie), Shakira(Debbi)
Middle row: Deb, Leslie Jamie, Nita
back row: Kelly, Stacy, Nancy, Vickie(me)


Here is a picture of all our frames sitting on a shelf in the crop room. I was impressed how everyone got busy and made the frames up even though some got out of there crafting feel good zone. It was fun.


I really liked the way my frame turned out. Here is an up close of the upper corners. Nice. I love those colors together!


I am glad I found out that I hadn't posted about the third visit before the year had ended. I didn't post much past June of last year so missed posting on the second trip. I love the retreats mostly because of people that go and the rejuvenation I get from it!

Stamp Club December 2010 Pendant

Our last Stamp Club of the year at Leslie's was a whole lotta fun. We decided the month before to have a Mexican food potluck and boy was there a lotta food! Leslie had chips, salsa, and guacamole, Nita mad awesome queso, Mo made some kick ass tamles, Heather and I took some cheese, chili, onion enchiladas and some Mexican rice, Jamie brought a Sopapilla Cheesecake that was to die for. There was more food there but for the life of me I can't remember what or who made it. We decided to get the most vital part of the night over with first and spent the first hour or so eating! Hmmmmm....with all the scrapbookers there I wonder why there weren't any pictures? The food was really good!!

The Stamp Club this month was the Pendant Bundle offered by Stampin Up! that consisted of the 116798 Simply Adorned 1" x 1-1/4" Charm, the 24" chain, and the Charming Stamp Set. The group had a blast crafts all sorts of insets to go in the charm and used various Stampin Up! stamp sets and papers from various vendors.
Heather used my matchbox die and made everyone their own jewelry box to store their pendant inserts in. I made everyone a pink flower to go on top of the box. I had made them by spraying some coffee filters (see there's the technique again) with Cranberry Crisp ink diluted with water let them dry and cut them out with the Big Shot and the flower die. In the pendant is the Stamp Club insert that Heather made for each one of us. This next picture looks a lot like the first but I thought the pendant was nice in the first one and the flower is nice in this one!!
The next couple of pics are of the inserts I made. Everyone had a bowl of 1x1-1/4" pieces of card stock and papers in front of them, stamps sets, embellishments and could pick and choose what they wanted to use.


Christmas inserts and Valentine Inserts


It was another fun night to be had by all. I am really looking forward to next month and this awesome bunch of women!

Saturday, December 25, 2010

Stamp Club November 2010 Christmas Cards, Box and Advent Calendar

I hope everyone had a Merry Christmas and is looking forward to the New Year this coming week. We had a good time over at Heather and Michael's and stuffed ourselves on her delicious turkey, dressing and fixings. I took over a big pan of mashed potatoes, fried okra, and some cranberry salad to share. It was yummy!

At our second Stamp Club meeting in November me met to make the advent calendar I posted about in an earlier posting, cards and card box from a single Simply Scrappin kit from Stampin Up!.


The Christmas Cheer Simply Scrappin' paper/sticker pack and a roll of Whisper White Taffeta ribbon made a card box, 14 6x4in cards, 8 3x3in cards, and the advent calendar with 2 pieces of paper left over. The only additional product used was Snail adhesive, dimensionals adhesives, big eyelets, and the bling that I bought a couple years ago and used to sparkle it up for my granddaughter! I used the Cricket with the George cartridge to cut out the Countdown To Christmas on the top bar of the calendar. If I was to do it again I think I would have sandwiched a piece of chipboard between the cardstock back and front to make it stronger.


The card box was made to hold the cards with a single sheet of the contrasting DP. It is 4 1/4x 6 1/4 in by 4 inches tall.


The everyone decorated their cards how ever they wanted to. All the cards used papers and stickers from the kit.


Once again everyone seemed to have a great time and we decided to add a potluck dinner to the agenda and agreed to meet to make the Stampin Up! pendant bundle. The bundle came with a stamp set and the medium pendant and chain.

Merry Christmas

Just wanted to take a few seconds to wish everyone a very Merry Christmas and the happiest of New Year's!

We are having dinner tomorrow with Heather and Michael and just spend some quality family time. This has been a very busy year for them with Michael traveling a lot and Heather was busy with school and graduated from OU with honors this spring. As a graduation gift to ourselves we went on a cruise. Sweet!!


Chad and his family is in Germany this Christmas and will be missed by all! They will be moving back to the states next year! Teresa has grown so much since they were here last year I can't wait for them to get closer to home!


Chuck has been busy traveling again this year to China for 3 weeks and Spain for 2 months. Chuck visited Germany a couple of times for short visits and in November was able to visit with Chad and family. I love this picture of him with Teresa. I am glad he is home now.
I finished my degree program and graduated this spring. I am staying busy here at home trying to get a kitchen redone and doing crafts! It has been a busy year around here!

Merry Christmas Everyone!!