Wednesday, April 25, 2012

Last project for Ten Second Studios Guest Designer


Today is my last Wednesday project as the Ten Seconds Studio Guest Designer for the month of April.  I have really enjoyed using the Ten Seconds Studio products in creating these projects and look forward to using them in the futures.  Thank you Cheryl and Megan for sharing this awesome product and allowing me to have these fun times with the VerDay!

My  project is a canvas that I made using some of the flowers that from last weeks project.  I once again chose Graphic 45 papers and built my canvas around those and embellished with Tim Holtz Ideology products.  I apologize for the quality of the photographs but  I couldn’t seem to get the lighting right to get the flowers the more copper color without washing out everything. They just had to be red for some reason so everything is warmer!  I took this one outside and it seems to be better then most and you can still see the variance in the pink to red in the flowers in this picture!  The real color is similar to the light pinkish coral on the bottom bud.  Any suggestions?

Journey canvas layout!


green butterfly!

The canvas is an 8"x8” natural colored canvas covered with paper from the 'Once Upon a Springtime' collection from Graphic 45.  I love the postcard and vintage feel of the paper and it fit well with my theme of a life journey.  

Another picture of the metal/paper flowers that I stacked on top of some paper flowers that I sprayed a peachy color to match up with the copper and brass I used.  I love the way each metal picks up a different hue when the patina oxidizes the metal. 

Check out this green of the copper butterflies and the pink of the flower...love it.  I told my daughter I had so many different greens and different metals on this piece but I really think it works out okay!


WOYWW #151

OMG!  I thought that #150 sounded like a gianormous number last week but #151 is over the hump and sounds really BIG! this week.  Welcome to WOYWW #151brothers and sisters...Whats WOYWW?  Oh my you are in for a treat.  Go to Stamping Ground and Julia will explain it all to you.  Take a cup of coffee or tea though as you will need it for the journey!
 I can't make Google Blogger work for me today as it wants all pictures to be topmost of the post and everything to be centered on the page.  What a mess!  Where or where did the old blogger go I didn't ask for this.  SO far I am only seeing a very few pluses to this update but most of it is definitely negative so far!  Does anyone know how to put words before a picture when starting a post?  I am going to have to spend a day figuring out how to work this mess  out!

UPDATE! I went in to change a spelling issue and the blogger had moved the OMG! paragraph to the top! This program seems to have a mind of its own!
 
I received a text  from my favorite local scrap book store and they told me that they had something that I was really going to like and that I should come in and check it own so I did!  Ahem!  I know way too much money but...I get a deep pocket discount cause I teach classes using the dies and it is really hard to pass up the new Sir Tim products when they come on the market.  I can't wait to try out the new match book (I also have the match box from Stampin'Up!) the cd envelope and the brown paper bag dies.  Awesome goodness I guess!
Here is a sneak peak of my last Ten Seconds Studio Guest designer projects for the month of April.  I really like how this turned out and think you will to!
Okay I think I will quit while I am ahead and have patience to keep on going and look at a few blogs before I go to bed.  I have big plans for tomorrow which means I can't be up to late tonight.  Nothing special...I am going to go to farmers market, put together a storage cabinet on the back patio and if there is any time left I am going to go to a few thrift shops here in town.

Hope everyone has a great week!

Saturday, April 21, 2012

Vintage Valise Chipboard Book

Some time ago I gave you a sneak peak of a chipboard book I was making using the Tim Holtz Vintage Valise die and Graphic 45 papers called Tropical Travelogue.  Over night Google updated the blogger platform and I am not quite sure what I am doing here so I apologize in advance for any weirdness that might occur!

  
I cut the front out of Stampin'Up! retired cardstock and glued it on chipboard and distressed it with Vintage Photo.   I used multiple dies to create the foliage and leaves on the lower left side.  Flowers came premade and I sprayed them with a spray I created using reinkers.  The chipboard bits on the ball chain came from Graphic 45.

Inside cover and Page 1  Me, Alan, and Chuck a favorite pastime whilst on vacation

I decided I needed an explanation of the trip on the inside cover of places and things.  Why?  To remind me of what's up after the drinks perhaps!

Pages 2-3 At the Bar Central in Bunyola, Mallorca, Spain
The bars in Bunyola were the hearts and hub of this small village.  People gathered to watch 'futbol', read the paper, have meals, wait for children to get out of school.  Definitely the social gathering place of the community.  Across the street from Bar Central was the Catholic Church and the priest would meander through the bar greeting the parishioners.  A nun used to stop buy when we were sitting outside and speak to Chuck and I in Spanish and when we responded appropriately praised us and went we didn't she gave gentle tutoring.  Lovely lady!
Pages 4-5 A trip to Porte Soller via Tram.  The Mallorcan train travels literally from one side of the island (Palma to Soller) to the other making stops along the way.  In olden days it was a several hours trip but now days it is less then an hour because of the beautiful new tunnel cut through the mountains that separates the island.  Once in Soller you board a tram that that takes you to the port which is still relatively unspoiled compared to some of the more touristy parts of the island.

Pages 6-7 The Cathedral (1400's), Palazzo de l'Almudaina (royal palace built in 1700's),
and Belveder Castle, Palma de Mallorca, Spain
The Cathedral and the Royal Palace sit side by side and can be seen from miles out to sea.  The Castle is up on a hill several miles out from downtown proper and also is clearly visible from the sea.  The Castle is a round castle, the first built in 1300, one of the first in western Europe

Pages 8-9 The market at Llumajor, Mallorca in the southern region of the island. 
We attended the big annual market and had it not been for our friend living there we probably would have had to walk a mile to get into the town.

page 10 and inside back cover  Our friends ancestral home...it has only be in the family 5-600 years! 
Back cover to the valise
If you click on the images you will be able to see the photo collages a little better.  I was going to describe every picture but...I don't have enough coffee in the house to keep you awake!  Hope you enjoyed it!

Friday, April 20, 2012

Should I say Thank You!

I received an email Wednesday from Stampin'Up! compliance department stating:

"We recently were made aware that your blog links to a site in which competitive products are available for purchase.

We want to remind you that Section 9 (d) of the Independent Demonstrator Agreement, the Competitive Activities Policy (Section 6.3) and the Internet/Web Site Policy (Section 6.22) of the Demonstrator Manual, state that demonstrators are not permitted to promote, market, or sell the products of other companies who offer similar products. This means you cannot promote competitive companies or post links to other companies who sell competitive products, including digital artwork."


Evidently someone in their infinite wisdom decided to 'turn me in' for noncompliance with the above stated policy. At first I was really kind of angry at both the 'anonymous' do-gooder that had turned me in and at Stampin' Up!. I am curious why that person didn't email me or leave a comment saying that I wasn't in compliance which I would have done had it been me. It seems like the intent was malicious and gave the informer some sense of superiority and that's why they didn't contact me! Then my next reaction was why after all this time had the informer decided to turn me in because I have been blogging since July of 2008 and no one had ever said anything because the SU catalogs have been on my side bar all that time. I think it might have been the title I put on the SU catalog on the right sidebar and where it linked to since the middle of the week. I had several emails from people wanting to know where they could get a matchbox die that I used in a previous project post so I called Stampin' Up! Tuesday and set up a demonstrator online web site so anyone who wanted SU access could order it through there and not have to search out a demo. I had one person tell me she had never seen or heard of SU until that post.

I signed up in November of 2008 as a hobbyist demonstrator (not to make money and still don't care about the money part) and had never been approached by any other demo except my recruiter and she was in the same boat in that the only other SU demo she had seen was her recruiter! I decided in 2010 to find out more and attended a meeting in Ft. Worth, a big regional event hosted by Stampin' Up! where I learned a lot about the product. I was so excited when I came home I contacted Stampin'Up! and requested information regarding SU up line and was given a local name and even attended a couple local meetings that were lead by people 6-7 demos up line from me. We were charged $5 to attend the meetings which were held once a month and learned various things about the products but once again I didn't learn anything about policies. I was told normally they don't have people at their meetings this far down line so I didn't go anymore.

After communicating with the compliance department at SU I was given information about the policies and how to find them on line in the Demonstrator Manual. I don't have time to read over the entire manual but I can plead ignorance over the policies until now because as a hobby demo the only thing I cared about learning was how to order my product at 20% off and I learned that from my recruiter before she disappeared out of my life. As time permits I will look through the manual and acquaint myself with the policies and just so you know as a hobbyist I don't expect to be treated any different then any other demo whether they be hobbyist or in it to earn money. I have complied with what the compliance department told me that I was in violation of and I have rid my blog of the offending links on my side bar and in my posts back to March 1, 2012.

I guess I should say thank you to whomever 'turned me in' at this point for making me aware of my ignorance... Nah, don't think I will. Have a blessed day.

Wednesday, April 18, 2012

Ten Second Studio Guest Designer Post: Flowers


It has been like Christmas since Cheryl at Ten Seconds Studio (TSS) sent me the box with the VerDay Paint and Patina and the metal in it! I have been experimenting to see what I could do and not do with it and what does and doesn't work for me. This week I have been having a lot of fun making flowers and I received a lot of comments about a flower I made to put on a canvas so I decided that today I would share how I made them. I *LOVE* VerDay Paint and Patina and have used it in making flowers from card stock, metal, and on a canvas one that I bought a while back and just doctored up a bit. The first thing you want to decide is what kind of flower, what color of metal you want it to be or look like and what dies or punches you will use to cut it out with. This could turn into a rather lengthy post so grab a cup of coffee while I try to condense it a little by breaking it down into metal or cardstock.

I am lucky to own a Big Shot and a Vagabond die cutting machine and love to use the many dies I have to create fun things. I used Sizzix dies called Flower Layers, Daisies, and Tattered Flowers a Tim Holtz/Sizzix. I used copper and brass sheets and the Flower Layers die to cut this first flower out.

I also used a flower punch from Stampin Up! to cut out a couple smaller flowers using copper but the brass metal sheet was too thick for the punch but worked fine with the dies. The metal flowers can be embossed after cutting with either the molds from TSS or embossing folders. I found embossing them gave the VerDay Patina something to hold on to to get a better oxidization and gave the color depth.
After approximately 24 hours you can take a sanding block and sand the pieces lightly to make the underlying metal shine above the patina. Next you need to take the flower pieces and stack them together securing them with a brad and start forming the petals. The metal that has been embossed has to be manipulated by hand curving and turning it to make the petals to prevent removing the embossing. I also use things like a pencil, chopstick, stylus or whatever to turn the edges over. If you didn't emboss you can use the metal working tools from TSS to turn the petals and give details around the edges and centers.


To make the paper VerDay flowers I painted the bronze and copper paint on white and brown cardstock drying it well before cutting it as I did the metals.


The cardstock will curl as it dries but it is just paper and you can flatten it out using brute force or an iron to straighten it.


Place pieces on a piece of craft foam and using the TSS metal working ball of the ball and cup tool gently use circular motion on the back side of the flower to make the petals curl.


How much curl you want to the petals depends on the size of the ball you use.


Here I just used the erasing tool to curl the center to make a cup to fit the pieces together.


I then lightly sprayed the flower parts with VerDay in a fine mister to start the oxidization process. There is a VerDay Patina Sprayer available from TSS but it has a coarser spray and the flowers need a lighter touch. The next step is to put the pieces together to form the flowers and I hit them with another mist of VerDay and let them sit a day to oxidize.


The canvas flower was easy peasy. I bought the flower a while back and decided to stamp and splotch it with the bronze and copper VerDay Paint and then sprayed it with the VerDay Patina. I hadn’t counted on the Patina causing a slight greenish coloration to the canvas but once it dried and started oxidizing I loved it!


Here are individual pictures of the flowers and what they are made up of. One thing I almost forgot was after the metal, paper, or canvas reaches the color you want it to oxidize to you will need to spray it with a fixative sealer to stop the oxidization.

Canvas with bronze and copper VerDay Paint and VerDay Patina. Unfortunately it doesn't show that greenish cast like the group photo. Trying to photograph and edit these photos was a lesson in patience this week!


Brass flower using Sizzix Flower Die, Brass Metal, VerDay Patina


Copper flower using Sizzix Flower Die, Copper Metal, VerDay Patina.


Another copper metal flower using the Tim Holtz Tattered Flower Die and VerDay Patina.


Copper Daisy using Sizzix Daisy die, copper metal and VerDay Patina.


White cardstock flower made using Bronze VerDay Paint and VerDay Patina. Tim Holtz Tattered Flowers Die.


Brown cardstock using the Bronze VerDay Paint and VerDay Patina. Tim Holtz Tattered Flower die.


I enjoyed playing around with the flowers and if you come back next week you will see what I made with some of them!

WOYWW #150

Woo Hoo! Wednesday again and you know what that means right? WOYWW!! I always look forward to Wednesday and getting my next fix of blogs. I appreciate that a lot of people have taken the person vs robot otherwise known as word verification off your comments but last week I hit 5 in a row and I quit leaving comments unless you commented on my blog. I think my medications are affecting me and I have been a little short tempered so I didn't comment on your blog last week I will try and do so this week. Okay you say what are you talking about? Whats On Your WorkDesk Wednesday (WOYWW) silly...still clueless? Check out Julia's blog Stamping Ground and she will tell you how you too can participate.


This is a picture of my desk this week. It is a mess. I have started working on a couple projects today one is a chunky ATC for a swap and the clock face is for a canvas I am making and I cut it out of brass metal with the Tim Holtz Weathered Clock die and it didn't cut very well so I had to clip at it with a blade and scissors to get the Roman numbers cut out. It looked a mess so I ran it through an embossing folder in hopes that the pokey bits from cutting would lay flat cause my fingers are shredded.

As you can see from the desk being loaded up I need more room as the 12" of crafting space is too small for the big altered projects and my journaling so sometime this week I am going to start my switching of rooms. I can't find anything and I don't have enough shelving and drawers to put everything in so some stuff just sits about and gets knocked about, crumpled up, and messed up or worse forgotten about and I end up going out and buying more only to find it later. I only have what amounts to one shelving unit so more is definitely needed.

Did everyone see my previous weeks post about the rusted box card? Check it out it is really cool. That was week number 2 and the third one will be posting at noon Wednesday so by my calculations I only have one more week as this months guest designer at Ten Seconds Studio. I have really enjoyed stretching a bit and getting out of the old comfort zone to make these things. I love metal working, paper arts, painting, and altering items so this has been a lot of fun for me. It has gone fast and I am sad that it is almost over!

For this weeks project for TSS I got busy with the VerDay Paints and Patina on metals and cardstock and had a blast making flowers. Here is a sneak peak to entice you to come back and check it out. I love making flowers so I thought a tutorial for making flowers would be good.


Hope you like it! I am going to go blog hopping and see what some of the peeps are up to before going to bed. Have a great week.

Wednesday, April 11, 2012

Ten Second Studio Guest Designer Post

Today I would like to share with you a card I made as a guest designer for Ten Seconds Studios (TSS) featuring VerDay Metal Paint and VerDay Patina. There will be a materials list at the end of the post if you are interested in any of the products used in the making of this project.

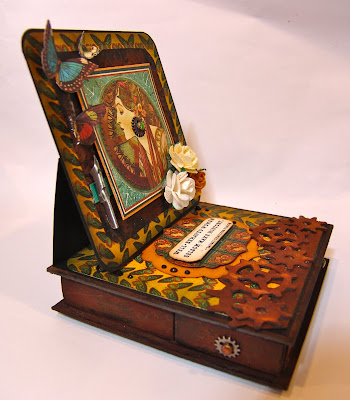
I wanted to create a rusted metal box look for this easel card so I combined the easel card and a match box card box to get the look I wanted. I used the dry brush technique in creating the mat for the front on the card. I love SteamPunk and have a lot of fun doing it my way! The papers used here are from Graphic 45 SteamPunk and Old Curiosity Shoppe Collections.
Front of the card. I love the Graphic 45 women in the SteamPunk Debutante Collection. They have a middleast appeal and are so haughty and tough enough to stand up to a rusty vintage look. I am sure everyone has heard of Alphonse Mucha and the Mucha girls...no? me either until I made a trip to Moravia and Prague, Czech Republic a few years ago and had the opportunity to visit a museum that featured some of his works. Mucha paints in an Art Nouveau style and Graphic 45 Steampunk Debutantes are a takeoff on his style of painting the Mucha Girls.

Left Side

Can anyone say rusted box? I painted the VerDay Metal paint on the box then went back and dry brushed the VerDay Patina around pretty heavily. I think it definitely created a rusty box look.


Inside the card! Don’t you love the way the old rusty gears turned out? It seems like the paint has a mind of its own and comes out different colors.

Open Drawers
Drawers opened and the card folded flat.

Materials used:

I would first like to talk about the VerDay Paint and Patina that I used. When Cheryl and Megan first showed us the video’s of the VerDay line I wasn’t to impressed to begin with but as they continued to show us the line I fell in love with all the possibilities that the paints could give me in my crafting endeavors. The first time I “painted” with the VerDay I was won over forever!
The VerDay Paints come in bronze, copper, metal, and brass and can be painted on just about anything then you allow it to dry and paint the VerDay Patina on and allow it to cure and the magic happens! Being new to the project I had to play a bit with it before I started making anything so here is what I found out by using the TSS Big Daddy mold 7a as an embossing plate. Awesome mold BTW ! The front side is a plate full of gears and the reverse side has different knot and cornice patterns that I plan on using in future projects. Here is a picture of the mold. (Yes Carol, it is flat and resembles a letter press plate and you can run it through your Big Shot without worrying about it breaking.)

To play with it I cut black cardstock into 6”x6” and ran it through the Big Shot with the BDAD 7a mold to get the gear/cog look. One piece I painted before the embossing, one after the embossing and the third one I just dry brushed. I was surprised at the differences achieved in each process.


Graphic 45 papers from the SteamPunk Debutant and Olde Curiosity Shoppe Collections

Stampin’Up! Products:
• Basic black, Very Vanilla, and More Mustard Cardstock
• Favorite Thoughts Stamp set for the sentiment
• Basic Black Ink Pad
• Grogain Ribbon
• Match box die

Tim Holtz
• Ideology min gears and pen nibs
• Mini Gears dies
• On the Edge die SteamPunk
Dew Drops for the feet
Mulberry paper roses
BoBunny brads for drawer pulls
Black Gems from Michaels dollar bins

Hope you like the card as I really enjoyed making it.!

WOYWW #149

Happy WOYWW! Drop by Stamping Ground and Julia will tell you how you too can snoop around some of the awesome desks! Hope you had a great holiday and enjoyed time with friends and family. I fixed dinner and my daughter and her husband came to have dinner with us. I miss not having a big family any more cause I used to enjoy the times we got together to share and catch up on what was going on in our families.
Not a lot going on on my desk today. I did make a couple Easter cards but forgot to photograph them before sending them on their way. I have a bad habit of doing that! I bought some canvases yesterday to make wall decor for my kitchen and was going to gesso them tonight but ended up going over to my daughters and watching a movie.
I have been having fun playing with the VerDay Paints and Patina and seeing what I could do with them. Yesterday I took copper and brass metal and cut flower shapes out using Sizzix dies and the Big shot. After I cut them out I ran them through the Big Shot in an embossing folder, painted them with the VerDay Patina and let them sit over night. I love VerDay cause it actually oxidizes the paint (it has metal in it) and metals to such a beautiful color then when I used the grit block on them the polished up so nice!
I have another project for Ten Second Studios coming out today and will be posting that later today...Also visit their site at Ten Second Studios and check out all the fun stuff that Cheryl and Megan are making using the VerDay Paints.

Wednesday, April 4, 2012

Ten Second Studio Guest Designer for April

Today I am going to share a project I made as guest designer for Ten Second Studios (TSS) using the VerDay line of metal paints.

I had bought an old manikin bust at Micheal’s a while back and when I was chosen as a guest designer I decided to try out the paints on the bust. I first glued the manikin bust to a 3 inch tall glass candle holder to give it some height then painted the whole thing with the bronze VerDay Paint. I allowed it to cure overnight then dry brushed the VerDay Patina on and was so surprised when it actually came out looking like a bronze bust!! I don’t know why I was so surprised because I had been watching Cheryl and Megan with their TT videos but I was surprised none the less!

After letting it set for another day or two I sprayed it with a spray sealer to give it an aged patina and to preserve the turquoise color the VerDay Patina gave it.

The flower on the shoulder is made using Stampin’ Up! (SU) Fabric, rhinestone brads, and the SU flower die for the Big Shot. The blue flower ribbon on the bottom of the manikin and on the fabric flower is from the Tim Holtz Ideology line. Lace is from my craft room stash as is the beaded necklace chain and gems that I bought the at Michaels a while ago.

I love the patina on the candle holder base. Who would think it was a cheapo $1 glass candle holder from Dollar Tree!!

Patina on the hips… Wish chocolate looked this good on mine!!

Artsy angles


I loved making this manikin and it will sit in my newly decorated bathroom when it gets done. I spent less then $10 total to make this project using only stash out of my craft room and altering it with the VerDay. How can I put a price on it though when I had a blast making it.

Materials List:

Ten Seconds Studio VerDay Paint and VerDay Patina
Stampin’ Up!
• Fabric,
• flower die for the Big Shot
• rhinestone brad
Tim Holtz Ideology Trimmings flower ribbon
Manikin and jewels from Micheal's.
Candle Holder from Dollar Tree
Lace from my stash