Wednesday, November 12, 2014

WOYWW #284

Thought I would jump in here as soon as I can to post my work desk this week.  We went out to dinner tonight to celebrate as it is Veterans Day here in the states.  I came from a long line of military people and I feel we fall short sometimes in expressing our gratitude for all these men and women do to in service to our country.  My father was Army, step father Navy, husband was in the Army, and my son is still active duty Army.  Chad met his wife Candice while stationed in Germany and she made Sergent before he did!  Candice left the service to have the grand babies and Chad continues on as a Warrant Officer now.  
Chad last year when he graduated from Warrant Officer school
My husband Chuck in 1970 just home from Vietnam!
I know I say it every Wednesday but its the truth I haven't the foggiest idea where the week has gone and I have been kept busy doing one thing or another.   I spent last night up at Heather's house working on some ticket strips for a swap and will write a separate post this week to show them off.  I am rather happy with the way they turned out for a first time making them.  Just like the altered keys from last week it was something new and different and fun to try. 

My desk this week....
I have made several cards and things for swaps but today my desk is covered with a fall card that I learned to make at a Stampin' Up! meeting when I was a demo a couple years ago.  It is simply called the Gratitude Card because of the name of the stamp set...Day of Gratitude.  They taught us how to use the markers to paint the stamps, paper pierce, and decorate envelopes to match cards!  I really enjoyed the conference because of all I learned.

A better and closer view of the card!  I think it is really cute.  You can see a bit of the largest stamp in the set in the upper left and on the corners of the card.  I love this stamp set a lot.
 The card was a lot of fun to make and I usually tend toward a grungier type of arting I still love to make beautiful stamped cards.

Speaking of beautiful cards I received this beauty from my Christmas Secret Sister today.  I always have so much fun sending and receiving cards and gifts from unknown people and trying to guess who sent it!   
That is it for today but check back later in the week and I will post about the tickets and maybe more pictures of the new grand baby!

If you are wondering what all this is about and why I am sharing my desk go visit Julia at Stamping Ground and click on the link about WOYWW and she will fill you in on the details. 

Wednesday, November 5, 2014

WOYWW #283

Running a little late again this week but I am here for WOYWW and to share some exciting news and photos.  First off to let the WOYWW's see my desk and then if you want to look at the rest of the photos stick around... What's WOYWW?  Visit Julia at Stamping Ground she has a linking thing on the sidebar that will take you to where you need to go to get the details of joining the fun!

My deskies my precious...
An overall of the room as you come in the door!  WOW I can see the floor!  OMG!  haven't been that busy I guess! 
My
The back desk with some new stuff my daughter bought me...twine, spools, wooden pieces etc.  I got some new stamp and die sets from Stamps of Life, and a new Tim Holtz wreath stamp/die set. 
Nothing going on on the L shaped wall desk...except Miss Ghost checking out I am doing what I should be doing!
A gift from a friend for doing the right thing...Thank you Laurel!
Latest make for a swap on ATT...Altered, Tattered, and Timeworn a Yahoo group.  I had never altered keys before and when I tried to use the big ones I showed a couple weeks ago it was way more work then I wanted to do and money for the bits and pieces.  These are smaller keys and I think they worked out fine!
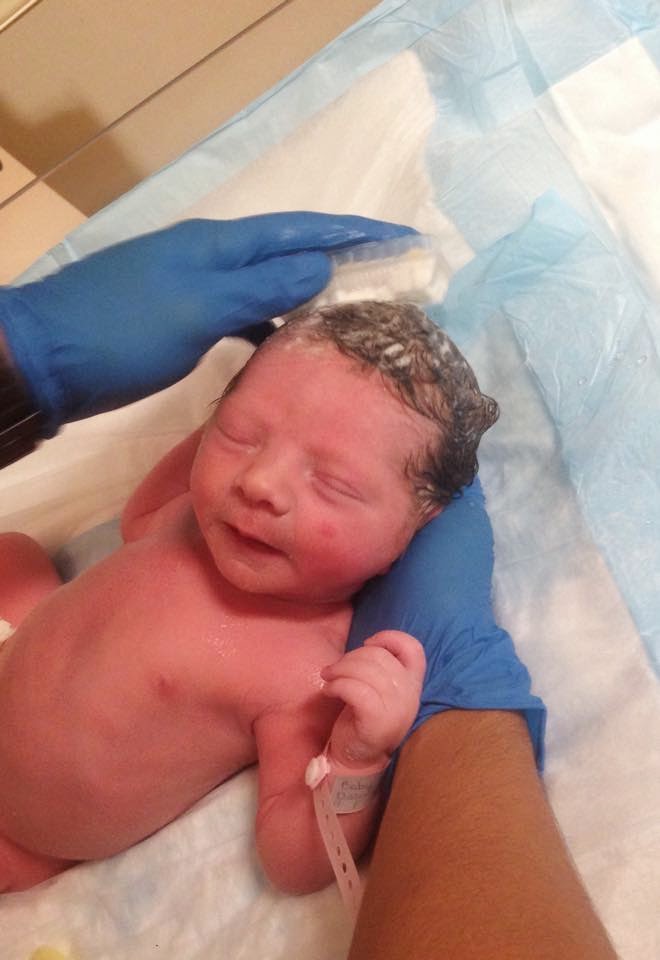
My exciting news is the birth of my new grandson on Sunday!  Mom and baby are doing great.  Here is a picture of him enjoying his first hair wash!
Charles A. Doswell V
6lbs 15oz
20 inches
Born 11:26pm
1 November, 2014
Not to leave sisters out here is a picture of them taken Halloween night in their costumes.  It was quite nice that Charlie gave big sisters a break and waited till after the festivities to be born  Teresa is 5 now and quite grown up and wants to take control so she chose Capt. America as her costume and Hannah is Rapunzel!  So cute!


Mom and Dad getting into the act!  Such a cute family and I am so glad they are mine.  
 Okay done deal.  I am going to post this then head out for an appointment and then Chuck and I will be going out with the kids for his birthday celebration today.  Can't wait to get pictures of CAD III (Chuck),  CAD IV (Chad), and CAD V (Charlie) on Thanksgiving. 

Wednesday, October 29, 2014

WOWYY #282

Another busy and full week has flown by and Wednesday is here again before I was ready for it...  That's another thing about getting older vs when we were younger is that when I was a kid it seemed to take an eternity for a week to go by now it seems like I sleep a night and a month has passed!   Welcome to WOYWW and what's on my desk(s) today.  Take a snoop around and take your time cause they are all junked up today.  Whats WOYWW?  Check out Julia and her blog Stamping Ground and come play with us!

Here are what my desks look like today.  The front desk is busy sorting various bits and pieces into a new box my dear daughter gave me to hold my plethora of plunder...  I don't know how I got so lucky to have such an awesome daughter  or so much crap!!

 Back desk is a dumping ground until this afternoon when I get back from an appointment and I will clean it off and mess it up again!
 It's not that the desk hasn't been busy... its because I am a slob and never put anything in its proper place!

Made a couple new cards for my Granddaughter's Halloween surprise!  As someone pointed out I made them pretty much the same for this age so they won't feel slighted!!  I made them bright and small so small hands could hold them...and spooky enough that it is Halloweenie but not scary enough to frighten them!  What do you think?
What's inside? 


Not the best stamp job I have ever done but I was using a new clear polymer stamp set and with a foam pad they were still stamping uneven.   Now not to be put off I ran to the stash and found all sorts of stickers and rub-ons to cover the mistamps over with.  I think the girls will like them no matter what they look like!

 I would like to say thank you to my Halloween Secret Sister for sending me this awesome box of goodies. 
 Sorry it isn't a better picture but I know you can see what awesome lot of goodies she sent me.  I love this sweater pin and the giant clothes pin that holds a spooky tag! 


Aren't they awesome!
 Have a great week and I am sorry I didn't make it around to every one's desk who came here last week but I promise I will this week even it ends up being next Tuesday night!! 

Wednesday, October 22, 2014

WOYWW #281 and more!

UPDATE: seems my auto post didn't post last night so everyone has been commenting on Monday's post...

My desk has been a little busy this week and as you can tell from this picture it is busy again today!  I am sorting and trying to get things together to make some keys for swapping that have to be in the mail next week...hmmm...13 altered keys in a week?  Having never joined a challenge like that it will be just that...a challenge!

I got the keys in a dollar bin at Michael's and they are actually metal and not resin so I am a happy camper here!  I have brought out some charms and bling...to the right and plan on starting these asap.  If you are interested in Altered Keys check out Pinterest.    To the left is my undone witches hat and some kiddie style Halloween paper that I am going to make the grand daughters some cards out of today.  I made these Halloween cards and thought they might not be appropriate for a 3 year old and 5 year old...  My desks are a whole lot cluttered today but I have been having loads of fun playing in my crafty room this week.  Want to see other cluttered crafty desks?  Check out Julia and Stamping Ground and come play with us!

Are you missing the witches hat that was on the Prima craft inks stand?  Well folks I got it done this week too!  Ta da!!!
I think it turned out wonderful!!  I love the colors and patina and it was oh so easy to make!!  More pictures you say...well Julia likes it kept simple so if you don't want to see the rest I am done with stuff for WOYWW...
A front view!
Left side!

Back side!


I first covered a plain old paper mache witches hat with bunches of grunge paper/board gears I cut out using the various Tim Holtz gear dies I have.  I then painted the whole hat with black spray paint!  Next step was covering the whole hat with VerDay Iron Paint and then spraying with the Patina spray.  VerDay is interesting because the paint actually has metals in it and when you spray it with the Patina you actually get oxidized metals.  Tenseconds Studios carries the VerDay products and you can get them in bronze, brass, copper, and iron like I used.   I plan on trying this on a couple other paper mache boxes I have using the different colors and you know the interesting thing is until I moved craftrooms I forgot I had these...Hey Darnell does this count as an NBUS?

Okay enough for me this week.  Already photo heavy but I will leave you with one last photo...my pool today! 
Sad day huh!!!  I miss my pool!  It is all covered and winterized for the up coming cold months!

Monday, October 20, 2014

Art Deck Inspirational Art Tags

A couple of weeks ago I signed up in a The Creativeblock-StampersAnonymous group to participate in a tag swap that is more then just a tag swap.  It is an inspirational art deck and everyone who participates will get a complete deck because Sandy is going to scan and print out a set for everyone who gets in a funk and lacks inspiration or is creatively blocked somehow.  I am really excited cause sometimes it is just the little things that will get me motivated and having deck of tags to fall back on will definitely help. 

The minimum number of tags each person had to create was 3 but the moderator of the group, Sandy, sent each of us five different color chips to play with.  Sandy said we could pick what three we wanted to do or if you wanted to do so you could use all five.  Well you know me....overachiever and all that!  I decided that I would do the five and here is what I came up with.   The color palettes paint chips are next to my completed tags and the colors didn't have to be exact but at least one of the colors should dominate your tag.  

Anyway here are the tags I made. 
All the tags are a variant of the #8 size tag.  These tags are 3.125"x 6".  


Tim Holtz (TH) Distress inks: shabby shutters, peeled paint, and black soot.  Stencils:The Crafter's Workshop (TCW) stencil (I think)and a Dylusions stencil.   Stamps: TH Classic Stamp 1 TH stamp set Going Somewhere. 
White Signo Uniball pen


Inks:  Black Soot, scattered straw, mustard seed, squeezed lemonade, wild honey, peeled paint and rusty nail.
Distress Pens: rusty nail, wild honey
Stencils: Dylusions
Stamps:  Inbetweenies and How does your garden grow by Dylusions.  TH Going Somewhere


This tag is covered with a paper from the Prima line called Natures Garden.   I loved the print of this paper and didn't do much to it to cover it up.
Glossy Accents covers the fairy.
Inks:  aged mahogany, tattered rose, spun sugar
Stamps:  TH Urban Chic
Recollections butterfly stencil
Artist Loft coarse texture paste.


 Another tag covered with paper from a DCWV paper stack called Once Upon a Time.
Inks:  aged mahogany
White Signo Uniball pen
TCW Stencil with Artist Loft coarse texture paste tinted with aged mahogany
Inspirational sentiment from
TH Purely Random set. 


For some reason these colors don't follow through true on the scanner the darker colors are almost identical in person!!
Inks:  faded jeans, weathered wood, black soot, Stampin' Up! Not Quite Navy.
TH stencil #8 Lattice
Stamps: Mini Holiday, Winter Sketch book
White Signo Uniball pen


It was a lot of fun creating these tags and if given another opportunity to do a similar project I would!  It was fun to be challenged and have to work outside my comfort zone! Next time I won't glue the backs and tags together till they are all done.  The paint chips got kind of messed up!  +];-)

UPDATE:  I used a gum eraser and just about all the backs cleaned up perfectly!  Yay!

Saturday, October 18, 2014

Halloween Cards

I spent some time crafting today to try and get caught up a bit on some challenges and swaps I am doing this month.  Today I made a card for a group on Facebook called Paper Crafting Swappers that had a challenge this month to create a card or lay out with the Bingo line you chose to create.  Once you had chosen which line you wanted the leader of the group sent you an email as to what you needed to use to create the item.  I chose left diagonal and my email said I needed to include in my project the following items: Paper clip, stitching (can be faux), a circle, ribbon and dry embossing. 

First time for me to join in any swaps with this group so this is what I came up with!
I think I covered all the needed items and then some!  The card is a 5"x7" kraft paper blank that I seem to have tons of in my stash.  The print paper is actually a left diagonal print (aren't I clever!) out of the DCWV Bewitched Halloween line that I cut 1/4" smaller then the blank on each side and glued down to the card base.  The fun begins now!  I cut a strip off a sheet in the same paper pack that had the Halloween sentiment and what I consider to be a faux stitching line each side of it.  After gluing that down I made a 2 1/4" circle that I inked up in coordinating colors and ran through the Vagabond in a Tim Holtz Spiderweb folder for my dry embossing.  I used an organdy ribbon to surround the circle, slapped a couple spiders on the web.  I decided to use a mini-paper clip to hold the little ghost to the left side cause it seemed a little bare over there to me.  I love all the wiggly eyes on the spiders and ghost!  The ghost is some card candy I received in a swap last year that didn't get used and seemed to fit with this card!

After finishing the card and posting it I got to thinking that I would send it to the granddaughter's for Halloween with a bit of cash tucked into it but...Well Teresa is almost 6 years old and Hannah just turned 3 years old and I thought they might like to have their own cards and money this year so...

I followed all the parameters for the previous card challenge and came up with this...my second card of the day!! 
 I used more paper from the DCWV paper pack and a cream colored base to make this card.  The ribbon is a pom pom ribbon from Stampin'Up! and the mini-paper clip is holding an October calendar (Tim Holtz stamp) and circling the 31st!  The circle was another one of the card candies from last years swap so I am clueless as to who makes that stamp or punches...looks like Stampin'Up! but I am not for for sure.  The bats are cut from a Martha Stewart edge punch.  

Now that I have posted these I am thinking that perhaps they are a little old for a 3 year and 6 year old!  I don't want either one choking on paperclips or bling!  Hmmm...might have to rethink this and create something that doesn't have detachable bits on it...what do you think?  Like the cards?  Should I use them or no? 

Friday, October 17, 2014

rocks to cactus

Okay you say!  Rocks to cactus!  Interesting!  For those inquiring minds asking about where I got this idea and how I did it!   The whole story is this...
Here they are in the pot where they now reside.  Now I didn't go for the OMG! they look so real look but for the "I really like these and I am so happy I don't have to worry about watering them look!"  I tried them in another pot but I like this one best.
A few weeks ago my dear husband sent me a link on Facebook showing this cactus garden in a bowl...Chuck thought I might be interested in trying my hand at making a display like the picture he sent me.  I did.  It took me a while to find the rocks I wanted/needed because to buy them at Michael's or Hobby Lobby could cost me a small fortune!  3 rocks for about $6 was a little steeper then I wanted to pay to play with.   I found the rocks I needed at an outdoor garden store that sells nothing but rocks, big and small, and the concrete statuary for outside near Newcastle, OK.   I paid about $10 for a huge lot of rocks(30 lbs.) and will probably have enough rocks for a lot of other projects for a long time.   I got to pick out what rocks I wanted and this is what I got.  Some flat, some round but mostly odd shaped and lighter in color.
First thing you need to do is give all the rocks a good bath.  OMG!  talk about dusty and dirty.  I guess the paint would eventually mix in with the dirt but a bath is good and I just set them out to dry for a few days in the sun.

Next thing I did was paint every rock a different color of green.  I added white or yellow to a basic green and painted a few rock, added some dark green or black in and painted a couple more....Get the idea?  Don't make it too hard cause it is suppose to be a fun project.  I did a web search and found a whole lot of info on painted rock cactus and I started painting mine just however I wanted and however I thought they would look as a caricature of a cactus.  I actually found some that looked like real cactus and I thought it was too much work and some that were even too primitive for me.  Check out Pinterest for some ideas.

So after painting all my rocks green and getting ideas from various online spots I started painting my rocks and detailing them. 

 
 From top left...
  1. dashed lines all across the top and down each side
  2. lighter colored lines that I made x's on and put a dot in the middle of each x.
  3. just lighter dots
  4. x's gone wrong here...I made what looked like flowers and put yellow dots in the middle
  5. a flower on the cactus.  Before I did the messed up flower I used various shades of green in a highlighting technique...fancy word cause I actually smeared paint on till I liked how it looked
  6. dashed dark lines on lighter green
  7. light x's on dark green
  8. a rock that had natural pock marks that I just painted green and left it alone
  9. once again I slapped some light and dark lines on until I liked how it looked then added white lines and x's with dots in them to simulate spines and stickers.
  10. dots and spikey lines.
a little better picture of the stones on the work table.

The other pot!  I thought it looked over crowded is why I moved it into the above pot.  I liked the way the natural rocks make them stand out too. 
 Hope this answered some of the questions I was asked.  I was surprised at the number of sites that popped up when I Googled painted rocks and then painted cactus rocks.  Give it a try.  This was a fun project.