Today is Wednesday and Julia has posted the WOYWW #108 on her blog Stamping Ground where all us crafters/artists gather each week to take a trip around the world from the comfort of our computer chairs. Click on the link and see what we have to offer. A legal snoop! WOW!
My desk has the lasted Options project kit from Pinecone Press that I picked up at the get together Tuesday. It has several different projects you can make using the kit. These kits are a lot of fun cause they contain everything you need to make the project and it is a no brainer cause your Mojo doesn't have to be present for you to create something. Usually I will start with a kit get enthused by it and branch out into something totally different.
Thought you might like to see a different view of the same desk. I really have it easy working from this desk! You can see my new drawers and the awesome bargain paper rack. If you look close there is the Clip It UP where some of my bling, flowers, buttons, and other embellies live. At the bottom of the picture is the new Stampin'Up! cattie that starts July 1 here in the states. Lots of fun new things and awesome stamps in this one.
I had scheduled a post on Sunday to come out today but for some reason it posted yesterday so today it will be my desk again. It has been a busy week crafting, gardening, and living. Besides the tags I made a frame for a favorite picture I took of my husband on a trip to Palma de Mallorca.
With all my spare time and energy I also decided to plaster the wall under the cabinets in the kitchen because I was tired of waiting for it to be done! I don't think it looks too bad!
I love all that I do but sometimes it is hard to get it all to fit in to what I can do. I felt really good the past week and it looks like I have probably done too much as I am having problems getting about tonight. Oh well! Life. I have a doctors appointment in the morning early with a new Rheumatologist who will hopefully know how to handle this darn disorder of mine so I guess I had better hit the hay. I am looking forward to seeing all the blogs tomorrow after I get out of the doctors.
Wednesday, June 29, 2011
Sunday, June 26, 2011
Christmas in July Class
We are going to do a Christmas in July assortment of classes this next month so all the newbies that want to make their own 'stuff' for Christmas will have plenty of time to do it. I decided I was going to do the 3 Tim Holtz style tags a little different this month and us Graphic 45 paper from last year that has these arched cutouts to make them with. Still used the Tim Holtz techniques but put a different twist on and made them simpler for the newbies.
The first one of father Christmas is my favorite I think. I like the vintage look and tried to keep that with the darker red Distress Stain and grey blue flower to match the grey blue/black color of the writing and in the leaves of his heads flower garland. I adhered a smaller picture from the same sheet of paper to a fragment charm and suspended it with bakers twine from a memo pin. I think the bakers twine and candy strip paper look good together!
This is an up close of the fragment charm tied with twine. It wasn't until I was tying it on that I noticed the candy cane stripe at the top!
The second tag of a vintage Christmas tree is my favorite I think!! I was thinking as I made this one that I think I am going to look in buying some of those bubbly candle lights this year hang red balls, maybe a snow man or two, and make a bunch of Christmas tags to hang on it. I think it would be pretty but I don't know what my family would think! I just won't tell them. I am just going to do it!!
I just love this tree. So simple! I have three or four years of Tim Holtz Christmas tags I can make to put on it. I made 6 from last Christmas and was thinking about doing this while I was making them. Hmmmm....it is an idea!
Tag number three is is definitely a favorite of mine! I know I said each one is a favorite and that is true! I couldn't choose just one that would be like choosing one child over another. don't you love the rich black and cream floral base? The back of this paper sheet was this print.
I added some vintage paper lace I had...don't know where I got it, dyed a flower red to match the red in the girls umbrella. I used glass beads on a glue dot in the center of the flower and then added a half pearl to the center of that. Really vintage feel to it!
Hope you like my Christmas in July tags. Class will be July 14th!
Materials:
Tim Holtz Distress Ink Pads
Tim Holtz Distress Stains
Adirondak Color Wash
Tim Holtz Stamps
Tim Holtz Ideology findings
Maya Road Mists
Graphic 45 paper
Saturday, June 25, 2011
Picture frame
Well I promised on Wednesday I would post pics of the picture frame and here it is! I think it turned out rather nice and I especially like it with a picture of my sweetie taken on a trip to Spain a few years ago! Chuck and I have visited the Bellver Castle , a circular gothic castle, in Palma de Mallorca, Balearic Islands, Spain several times and every time I go I see something new and interesting. I love the views of the ocean from the top!
In making this frame I used a Creative Imaginations Ribbon Frame covering it with various pieces of 2"x2" paper squares out of the Tim Holtz Paper Stacks. I love that paper because you get it all in one pad, 12"x12", 6"x6", 2"x2", and various other sizes of print paper. Awesome!
After covering the front and back with the paper I distressed around the edges and then highlighted some of the bits of paper with Perfect Pearls that I painted on with a paint brush. After letting it dry for a while I then followed up with several thin coats of Matte ModPodge sealer to protect it and help seal it down! On about the third coat I realized that I had left most of the back rather blah with little color but it was too late now! Before I had started gluing down the paper I cut the top of the frame apart and used Maya Road black spray mist and a glittery grey to cover the inside of the frame and the chipboard piece that holds the picture. After Mod Podging the collage I used a piece of clear acetate to cover the picture and glued it all down centered in the opening. I laced the top of the frame together again using Stampin'Up! seam binding ribbon in Crumb Cake!
I used the Tim Holtz glassine paper and flower die to make the large flower. I ran it through the Big Shot in a Stampin' Up! Embossing folder and added a vintage brad to the center. The red flowers are sprayed with Maya Road Mist and bling added.
I stamped the sentiment from the Stampers Anonymous stamp set Stuff to Say on a journal ticket and distressed around it in Vintage Photo. I guess I should say that all the ink used in this project unless otherwise listed was Ranger Distress Ink Pads. Hope you like the end result of my peak on Wednesday!
Materials Used:
Tim Holtz dies used on making this frame: Mini Branch & Leaf Set, Mini Lock & Key Set, Mini Flourish, Tattered Florals, Elegant Flourishes.
Tim Holtz Paper Stack: Lost and Found, Crowded Attic, Shabby Chic, and Seasonal. Journaling tickets
Tim Holtz findings: philosophy tag, mini pins, trinket pins.
Tim Holtz Distress ink, Walnut Stain, Vintage Photo
Stampin'Up! embossing folder, antique brad, crumb cake seam binding.
Maya Road Mist
Creative imaginations frame
Mod Podge from Plaid
Perfect Pearls Powder
Wednesday, June 22, 2011
WOYWW #107
WOW!! Wednesday again! Seems like this week has flown past a little faster then the ones that preceded it. I don't think I have been doing anything any different but... I have been busy crafting and cleaning and gardening...you get the idea. Idle hands haven't got a chance in this house cause something will come along and make them busy!
Welcome to my desk this Wednesday! There are a bunch of stamps I have taken off blocks and put in plastic boxes on the left side of the desk, right side has some cards I finished this week, check previous posts if you would like to see them. I also made a wall canvas using Tim Holtz products that you can see here! The center of the the desk is covered with a bunch of stuff I have out to do a picture frame for a class I am thinking about doing. I think I will first spray the white chip board frame with the color wash then make a collage with all the different 2"x 2" squares I can cut apart from the strips. Distress the edges and cover the whole thing over with something that give it a little 'shiny' or 'sparkly' effect. I think I might spray the whole thing over with a Perfect Pearls wash to get that shimmer effect and then bling it up with a couple flowers, some die cuts, a journaling ticket etc. Any ideas to help me out?
WOYWW is a so much fun and so addictive I really look forward to Wednesdays now! Wonder what it is all about? Visit Stamping Ground the home of Julia Dunnitt, the Queen of Snoop, and see what I am talking about. I am going to post this now so I can make a cup and sit and snoop awhile myself. Have a happy Wednesday!
Tuesday, June 21, 2011
Red, White, and Blue #2
I have some more cards to share that I made at the crop on Saturday night. I love to get out and go over to the scrapbook store and sit around and work with friends and family! I love being surrounded by all the creativity not to mention all the awesome stuff that decorates the walls and shelves that I can purchase!
I love BoBunny papers! They are always so much fun to use and such high quality that they never fail me in what I am making! These next patriotic cards are matted with papers from the BoBunny 12"x12" and 6"x6" Liberty Paper packs. The card backs are the Stampin'Up! card stock. The card candy is from the Splitcoast Stampers stampers candy swap last year! I do have to brag and say that most of what I used on the cards is candy that I made. I love the instant gratification that making candy gives me and WOW! it is really easy to throw together a card!
Card 5...
Card 6...
Card 7...
Card 8...MIA...my friend I was cropping with whined so long and hard about wanting that particular card what was a friend to do but give it to her. Rhonda is a avid...rabid...fan of my creativity and tells me when I am right on or way off center with what I am doing...almost like another daughter cause that is what my daughter does too. True friends don't lie or fabricate and Rhonda will tell you if she doesn't like it!
Monday, June 20, 2011
Wall Canvas
I wanted to share another project I finished Saturday! It is a 12"x12" wall canvas I created using Tim Holtz products. This canvas will hold a 5"x7" photograph and think one of my husband and I in sepia tones would look awesome on it!!! The paper background comes from the TH Crowded Attic paper stack. I used the Sketch book tissue tape to go around the outside edges of the frame. Ideology Pen Nibs, Regal Adornments, Memo Pin, Locket keys, Foliage, Philosophy tag, Film Strip Ribbon, Swivel Clasp, and Brads. I used some 2 in wide taffeta ribbon to lay my embellishments on. The picture mat is made of Stampin'Up! cardstock in chocolate chip and soft suede. I punched the corners with a Martha Stewart punch.
No matter how I tried I couldn't get a good picture of the mulberry paper roses and those dark fabric roses. If I got one in focus the color and focus would go out on the other. Here is about as close as I could get it. Aren't they pretty!!
Red, White, and Blue
I went to a crop last night and spent a pleasurable evening crafting and gabbing with a bunch of my friends. It is always so much fun to get together and share ideas and get input from others on what they are doing and new things to learn.
Last night I couldn't make up my mind on what to make so I took several possible projects and one was to make cards for the 4th of July, Independence Day here in the USA. I had participated in a swap on Splitcoast Stampers last year to make patriotic card candy. I made a total of eight cards last night so thought I would divide them up over two days so I don't overwhelm anyone with them! All the cards blanks are made from Stampin'Up! card stock. The stamped images are from the swap. Bling from my craftroom stash. I think they are Recollections from Michael's. The paper mats are from BoBunny.
The first card I have named Eagle because it is a national bird and an emblem of our freedom!
The second card...America
The third card...Freedom
Fourth card...I love America
More tomorrow...
Wednesday, June 15, 2011
WOYWW #106
The weather has not been cooperating with me tonight! We got a severe thunderstorm through here at about 7:30 pm and it knocked power out for over 4 1/2 hours. It started out with a lot of thunder and lightening and then to liven things up a bit we were hit with 55-60 mile per hour winds and hail the size of marbles and a friend measured some at her house that was over 2 1/2 inches in diameter. I haven't heard the official rain total but I would imagine it was at least 1 1/2-2 inches in about an hours time. I ended up cooking supper by candle light and we ate supper at about 10:45!
I had planned on showing some pictures of the flower and vegetable garden tonight but didn't get pictures before the storm and after the storm every plant in the garden had been shredded. My husband had some beautiful corn, beans, squash, and tomato plants but alas no longer! I haven't been able to do any crafting this week but was going to start a project tonight and now without electricity I don't have light to do any work. I took these photos of my craft room using flash so I can show you something of what I am doing. I am so excited that it is starting to come together!
First off here is a picture of my desk this week. You aren't going to believe how little is actually cluttering it up!! Surprise! If you didn't make it to my blog last week I told everyone I had decided to stay in the smaller room but due to space issues I am putting in new storage drawers/shelves etc.
This second picture is of the closet that I put a shelf unit and a couple of the plastic 4 drawer bins in, stacking them so I could have more space for my 'stuff'. I decided to move the paint bottle rack to the closet because I needed the space for my stamp pads that I use more then the paint.
I am not finished with the closet yet as I want to organized some of the things a little different but decided to put stuff in the approximate position it will end up in the end so I can keep shifting stuff around. I have so much 'stuff' that I am seriously thinking about unloading some of it on eBay!
If you have made it this far in the post you are probably wondering what all this is about! WOYWW is the brain child of Miss Julia Dunnitt at Stamping Ground. Every week I travel the globe looking at the desks of other crafters/artists without leaving the comfort of my desk chair. Check it out! Click the link and get ready for a ride of a lifetime. I am off to check out the blogs. Check back later and I promise I will have 'created' something.
Wednesday, June 8, 2011
Summer of Color Event
I was blog surfing through some of the blogs I currently subscribe to when I read a post about the blog Twinkle Twinkle and that it was hosting a summer of colorful and creative art challenges. Wow sounds like a whole lot of fun to me so I am going to be joining in. Evidently they will supply the color challenge and it is up to the artist to supply the art. I think I will probably do some cards, some altered objects, ATC's and whatever else I decide to do. I am really looking forward to this!
WOYWW #105
Hope everyone has had a chance to recover from the wonderful party that was the 2nd Birthday Anniversary of What's On Your Workdesk Wednesday last week. I made it around to every blog and really enjoyed reading and snooping around the sites. Blogger wasn't functioning up to par and occasionally I couldn't leave a comment. If you want to find out more about what I am going on about pay a visit to the Queen of Snoops site and meet Julia Dunnitt and join in the fun.
This week has been a very busy week for me. I had a class teaching Tim Holtz style tag making to a group of 8 awesome women. They were all pleasantly surprised that they too could do that grunge and Steampunk stuff. We did three tags total, one using Ranger color wash, one using stains, and one where we made a stamp out of the Elegant Flourish die. I made these tags in April for a class last month but because of 3 deaths in the family/friends didn't get to do it till this month. Everyone had a blast and told me that they were looking forward to next month.
Another thing I have been busy trying to get done is get the house and my craft room/studio reorganized. That isn't an easy task for me with some of my health issues but I have been plugging away pushing the limits to do a little bit each day. I have decided to stay in the small bedroom and reorganize it rather than to transform the larger spare bedroom into a studio. I like this room and get good vibes when I am in there and I think I would rather the bigger room be used for guests. I don't know might change my mind next week but this is what I have done so far. This is my desk this week! Messy much? Yeah a lot! I spent two days putting together this drawer unit, actually 2 units, to store my stuff in. Unfortunately you can hardly see the unit. I got them at IKEA and I think I am going to love it/them.
Another view of the drawer unit. There are a total of 3-3in deep and 3-4in deep drawers in each unit giving me a total of 12 new drawers to store stuff in! I bought these about a year ago and was waiting till I got in my new room and after deciding to stay in this room I spent 2 days off and on putting them together.
Thought that you might like to see what is in the one drawer! It is all my border and corner punches! I actually have 3 drawers full of punches and when I was putting them in the drawers I thought OMG! I am a hoarder but I don't think this qualifies cause I use each and every punch through out the year and God knows it is the tools of my trade. Cross my heart!!
Now this is the big bargain find for my 'new' craft room. My nephews wife (guess that makes her my niece-in-law I think after this she will be just niece!) is a garage sale/thrift shop shopper and a while back she called and then she texted me a pic of a paper rack and wanted to know if I wanted it! Did I want it? Are there cows in Texas? Still a Pope in the Vatican? Long story short I told her "sure if it is reasonable" all the time expecting to pay $25-35 for it. My darling dear niece got this rack for the outrageous price of $6. Awesome huh!
Well I guess that is enough chatter for this week. I hopefully will have things organized and some thing nice to show you next week! I am off to snoop around WOYWW blogs! Have a good week!
Sunday, June 5, 2011
Candy Giveaways
While web surfing today I found some yummy blog candy giveaways that I thought I would
share. Lots of fun stuff!
Vicky's Sticky with Icky blog candy
Mariannes Craftroom
Di's Digi Downloads
share. Lots of fun stuff!
Vicky's Sticky with Icky blog candy
Mariannes Craftroom
Di's Digi Downloads
Thursday, June 2, 2011
OWSE ATC SWAP 5/2011
I really have been having fun doing the swaps at the Outlaw Women Scrapbook Emporium! Each month Michele tells us what style/theme the ATC should be that month and we make 5 ATC to share. This month was anything goes and I decided to try using the new Tim Holtz stains and stamps. I really loved the vintage photos in the Lost and Found Paper Stash and used them as a focal point.
Each ATC's background is different depending on how heavy a hand I had with the stain bottle. I like it though. This one is a favorite. See the impishness in his eyes.
The June Theme is Patriotic and it can be any style of art, grunge, cutesy it is the artists choice! Want to play? Go to the OWSE and sign up!
Wednesday, June 1, 2011
WOYWW #104 and the 2nd Anniversay Partay!!!! Grungy Monday 09
Happy Anniversary to all the other WOYWWers that participate here at Julia Dunnits blog Stamping Ground! This week we are celebrating the anniversary by PIF-ing...swapping gifts. I only joined about 6-7 months ago but I have had a blast participating in the blog snoop each Wednesday and look forward to seeing every ones desks and projects they have made. Check it out it might be something you would be interested in doing! WARNING: it can be very addictive!!
My desk is an absolute disaster tonight and there is no way I am going to show it off. Truth of the matter is I couldn't get a picture that wasn't fuzzy or crappy looking so I just decided to show off what I have been doing this week instead. I think something might be wrong with my camera...oh no!!
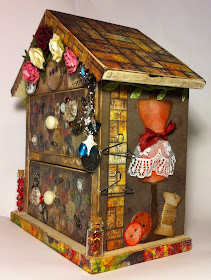
Remember this house that I showed everyone last week that I was going to alter? Well I finally got the blasted thing done yesterday after a lot of futzing around trying this or that out. I am really pleased at how the house turned out!!
This picture was taken with the same camera under normal light and I don't think it does it justice color wise. The papers are all from Tim Holtz paper stashes Lost and Found and Crowded Attic. The dies and some Ideaology used are also Tim Holtz. The rest of the stuff, buttons, flowers, ribbons,etc are from my stash.
Here is an up close of the side of the the house. I used the Sewing Room die on both sides cause I like it and I thought it would look good...don't think I am lazy...just coordinated!
For this fob I used a swivel clasp and a button I had and attached various dangling things to it. Cool huh! Since it had the short little bottle I thought it needed a little something else on that side!
Here is an up close of the drawer fronts. I used some Accent Glaze and gave some of the buttons on the paper dimension and then used it to adhere buttons and pins to the front.
Anyway that is it. What do you think? Let me know what I could have done different or better. What am I going to do with it? I think I am going to use it to hold some of my hand sewing stuff like a box of pins, a tape measure, a few buttons etc.
I am going to go now to Stamping Ground and sign in then fix me something to drink and surf around to the other blogs to see what is on other peoples desks this week. Thanks for dropping by!
I decided after posting this for WOYWW to also use this as my Grungy Monday 09 over at Studio L3. I think it fits the Shabby Chic criteria that the challenge was about and I didn't get it finished until Tuesday! Linda Ledbetter sponsers a weekly challenge to anyone interested in learning to use/do Tim Holtz techniques.